

Installing hollow pin chains on sprockets is a crucial process that requires precision and knowledge. As a trusted supplier of Hollow Pin Chains, I understand the importance of getting this installation right to ensure the smooth operation of your machinery. In this blog post, I'll guide you through the step-by-step process of installing hollow pin chains on sprockets, providing you with valuable insights and tips along the way.
Understanding Hollow Pin Chains
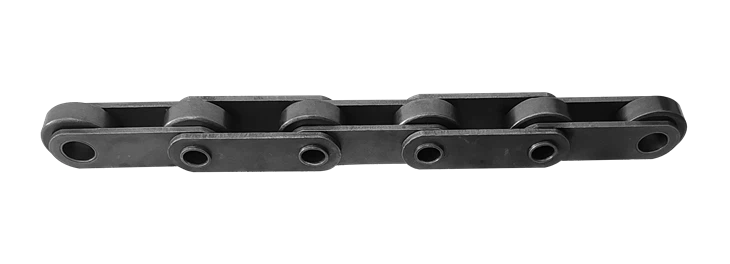
Before we dive into the installation process, let's briefly discuss what hollow pin chains are and why they are widely used. Hollow pin chains are a type of conveyor chain that features hollow pins instead of solid ones. These hollow pins allow for easy attachment of various accessories, such as flights, buckets, or other conveying elements. They are commonly used in industries such as food processing, packaging, automotive, and more.
Hollow pin chains come in different sizes, pitches, and materials to suit various applications. When selecting a hollow pin chain for your sprockets, it's essential to consider factors such as the load capacity, speed, environment, and the type of accessories you'll be attaching. You can explore our range of Hollow Pin Chains to find the perfect fit for your needs.
Pre-Installation Preparation
Proper preparation is key to a successful chain installation. Here are the steps you should take before installing the hollow pin chain on the sprockets:
1. Inspect the Sprockets
Start by inspecting the sprockets for any signs of wear, damage, or misalignment. Worn or damaged sprockets can cause premature chain wear and lead to operational issues. Check the teeth of the sprockets for any signs of chipping, cracking, or excessive wear. If you notice any problems, replace the sprockets before proceeding with the installation.
2. Clean the Sprockets and Chain
Thoroughly clean the sprockets and the hollow pin chain to remove any dirt, debris, or old lubricant. Use a suitable cleaning agent and a brush to clean the sprockets and the chain. Make sure to dry them completely before installation to prevent corrosion and ensure proper lubrication.
3. Measure the Chain Length
Measure the length of the chain required for your application. It's important to get the chain length right to ensure proper tension and operation. To measure the chain length, you can use a chain length measuring tool or follow the manufacturer's guidelines. Make sure to account for any additional length required for attachments or adjustments.
4. Gather the Necessary Tools
Collect all the tools you'll need for the installation, such as a chain breaker, a punch, a hammer, a torque wrench, and a lubricant. Having the right tools on hand will make the installation process easier and more efficient.
Installation Process
Now that you've completed the pre-installation preparation, it's time to install the hollow pin chain on the sprockets. Follow these steps for a successful installation:
1. Position the Sprockets
Position the sprockets on the shafts according to your application requirements. Make sure the sprockets are aligned properly and securely fastened to the shafts. Use a torque wrench to tighten the sprocket fasteners to the recommended torque specifications.
2. Thread the Chain
Thread the hollow pin chain onto the sprockets, starting from one end. Make sure the chain is properly seated on the sprocket teeth and that the pins are aligned with the holes in the sprockets. If necessary, use a punch and a hammer to gently tap the pins into place.
3. Connect the Chain Ends
Once the chain is threaded onto the sprockets, connect the chain ends using a connecting link or a master link. Make sure the connecting link is properly installed and secured according to the manufacturer's instructions. Use a chain breaker or a punch to remove any excess pins if needed.
4. Adjust the Chain Tension
Proper chain tension is crucial for the smooth operation of the chain and the sprockets. Adjust the chain tension according to the manufacturer's recommendations. You can use a tensioning device or adjust the position of the sprockets to achieve the correct tension. Make sure the chain has enough slack to allow for proper movement but not too much to cause excessive vibration or wear.
5. Lubricate the Chain
Apply a suitable lubricant to the chain to reduce friction and wear. Use a lubricant that is compatible with the chain material and the operating environment. Make sure to lubricate the chain evenly along its entire length, including the pins and the bushings.
Post-Installation Checks
After installing the hollow pin chain on the sprockets, perform the following checks to ensure everything is in order:

1. Check the Chain Tension
Recheck the chain tension to make sure it is still within the recommended range. Run the machinery for a few minutes and observe the chain operation. If you notice any signs of excessive tension or slack, adjust the tension accordingly.
2. Inspect the Chain and Sprockets
Inspect the chain and the sprockets for any signs of abnormal wear, noise, or vibration. Check the chain for any loose pins, damaged links, or improper alignment. If you notice any issues, address them immediately to prevent further damage.
3. Monitor the Operation
Monitor the operation of the machinery for a few days to ensure the chain and the sprockets are working properly. Pay attention to any changes in performance, such as increased noise, reduced speed, or uneven movement. If you notice any problems, contact a professional for assistance.
Tips and Best Practices
Here are some additional tips and best practices to keep in mind when installing hollow pin chains on sprockets:
- Follow the Manufacturer's Instructions: Always follow the manufacturer's instructions and guidelines when installing the chain and the sprockets. This will ensure proper installation and prevent any warranty issues.
- Use the Right Tools: Use the right tools for the job to ensure a safe and efficient installation. Using improper tools can cause damage to the chain and the sprockets.
- Maintain Proper Lubrication: Regularly lubricate the chain to reduce friction and wear. Follow the manufacturer's recommendations for lubrication intervals and use a high-quality lubricant.
- Inspect and Replace Worn Parts: Regularly inspect the chain and the sprockets for signs of wear and replace any worn or damaged parts promptly. This will help prevent unexpected breakdowns and extend the lifespan of the components.
Conclusion
Installing hollow pin chains on sprockets is a straightforward process if you follow the proper steps and guidelines. By understanding the chain and the sprockets, preparing properly, and following the installation process carefully, you can ensure a successful installation and the smooth operation of your machinery.
If you have any questions or need further assistance with installing hollow pin chains on sprockets, or if you're interested in purchasing high-quality Hollow Pin Chains, Sharp Top Chains, or Metric Long Pitch Conveyor Chains, please don't hesitate to contact us. We're here to help you find the best solutions for your conveyor chain needs.
References
- Manufacturer's manuals and guidelines for hollow pin chains and sprockets.
- Industry standards and best practices for chain installation and maintenance.


